Map Editor: Difference between revisions
| Line 114: | Line 114: | ||
'''Take Screenshot''' | '''Take Screenshot:''' | ||
*'''Opt-in to a Modding build under steam betas to enable the developer tools''' | *'''Opt-in to a Modding build under steam betas to enable the developer tools''' | ||
*'''Open up the developer tools by pressing ` or HOME''' | *'''Open up the developer tools by pressing ` or HOME''' | ||
| Line 123: | Line 123: | ||
'''Edit Screenshot''' | '''Edit Screenshot:''' | ||
*'''Open screenshot of map in Photoshop or GIMP ''' | *'''Open screenshot of map in Photoshop or GIMP ''' | ||
*'''Crop your shot down to just the map terrain''' - (a little black at the very edges is okay.) | *'''Crop your shot down to just the map terrain''' - (a little black at the very edges is okay.) | ||
Revision as of 13:11, 21 February 2018
The Map Editor is the tool the Ashes of the Singularity team uses to create maps. It has many powerful options, but be aware - generating maps at high quality levels, and especially at large sizes, requires a ton of CPU and RAM. Minimum of 16gb RAM is recommended for creating maps.
Enabling the Map Editor
To enable the Map Editor add the “-modding” (without the quotes) to the Launch Options for the game (in Steam, right-click the game, go to Properties, click Set Launch Options in the General tab). That will add a Map Editor button to Modding menu of the game. From there you can decide if you want to modify an existing map, or create a new one. If you create a new one the menu to the right is presented. If you are going to edit an existing map, you should make a copy of the original map and modify the duplicate with a new name.
DX11 should be used with the Map Editor as running DX12 will cause issues where objects such as the cursor don't properly display. Running windowed mode will also make it easier if you have issues and need to force close the game.
New Map Options
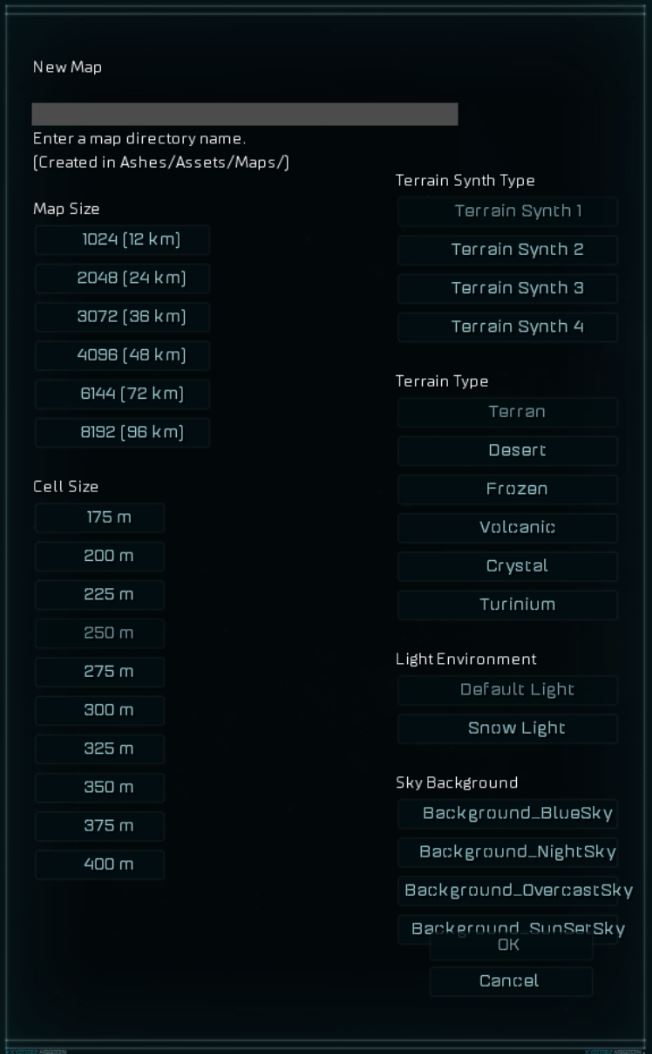
When creating a new map, there's several options to choose from:
- Map Name - The name the map shows up as in-game. This can be changed later on simply renaming the map folder, so don't stress about getting the perfect name when you are first starting.
- Map Size - 12/24/36/48/72/96 correlates to Arena(Currently not used),Tiny,Small,Medium,Large,Enormous.
- Terrain Synth Type - Effects textures of the map. Just leave this at 1 as changing it can cause issues.
- Cell Size - The smaller the cell size, the smaller terrain objects you can place but will increase map size. I'd recommend you leave this at default of 400 to avoid issues, and the difference is negligible.
- Terrain Type - The type of map terrain used, such as snow or desert. This can be changed later.
- Light Environment & Sky Background - These change the lightning profiles used, such as if a map is during the day or night. Changing these on Volanic, Crystal and Turinium Terrain Types will cause a crashe.
Map Editor Commands
- File - This is where you can edit the MapProperties.xml file for increasing Turinium Requirements, go to the folder where the map information is stored or exit the Map Editor.
- Show/Hide Help - This displays some useful information for using the Map Editor. I have it set to display help in the above screenshot.
- Toggle Display Mode - This changes how you are viewing the map. In the above screenshot I’m not looking at modeled terrain. It’s often easier to layout the map in this mode. But you can switch over to realistic terrain if you want to see exactly what your map would look like to the player.
- Enable Symmetry - Enable this if you want your terrain painting to be symmetrical. If it is set you can choose to make is symmetrically mirrored or use a radial symmetry for multiple equal positions.
- Terran/Desert/Frozen/Volcanic/Crystal/Turinium - This is quite misleading, this is supposed to let you change terrain setting but this doesn't stay after you saved the file. To actually change the the map from terran to desert you need to edit the GraphicsSettings.csv file with Notepad++. A much easier way of doing this is just copying the GraphicsSetting.csv file from another map that has the desired terrain setting.
- Brush Size - When painting terrain or cosmetics this is the brush size you would like to use. Also [ctrl+mousewheel]
- Edit Terrain - Chose the terrain type to paint from 7 base terrains:
- Plains - Normal ground
- Plateau - Higher ground that the player can still move and build on. Height is an advantage for many units so plateaus generally make for good defensive positions.
- Hill - Hills connect Plains and Plateaus. Use them to determine where players can access one elevation from the other.
- Mountain - Mountains are impassable by anything except flying units. Use them to block parts of the map.
- Basin - Basins are also impassable to anything except for flying units. But units with long enough range can fire across basins.
- Highlands - Like Plateaus, but higher. Connect them to other terrain types with Hills.
- Lowlands - Like Plains, but lower. Connect them to other terrain types with Hills.
- Edit Buildings - Use this to place the following on the map:
- Player Seed - A player's Nexus, their starting location.
- Relay - The heart of a region. Surround it with Metal and Radioactive deposits to decide what that region offer.
- Turinium_Generator - This is a special type of power generator that can provide victory points.
- Metal_Deposit - Provides Metal for the player who owns this region.
- Radioactive_Deposit - Provides Radioactives for the player who owns this region.
- Artifact - Ignore this, it's not functional.
- Scale Unit - Ignore this, it's not functional and just causes crashes.
- Dead Region - Determines the connection between regions. Useful for setting up cutoffs.
- Edit Cosmetic - Place alternate ground textures. This makes the map look more detailed and varied, it is recommended you use lots of cosmetics all over the map. NOTE: Turn off symmetry when editing cosmetic details!
- Edit Effects - Place particle (Smoke) effects on the map. This is currently experimental and I recommend you don't use any of these as it can cause crashes
- Build Quality - Determines the texture quality generated on the map. Raising this will increase the amount of time and memory required to generate the terrain, so leave it at 1 while testing. Stardock generates at terrain quality 3 or 4 for our final maps. Anything higher than 4 will probably crash your machine. The larger the map size, the longer and more difficult it is to render. Small maps render out at 4, large maps at 3.
- Erosion - Affects texture quality. I'd recommend just leaving this at its default else raising it can cause issues.
- Terrain Synth - The style of slopes and mountains generated by the erosion simulation. I'd recommend leaving it at 1 and 2 as anything else is experimental and may cause issues.
- Rebuild Terrain - This regenerates the map with any changes you have made so you can see how they look. This is effectively "saving" the map.
- Regionalize / Save Cells - Reloads map settings, but doesn't regenerate map changes. This is only useful for updating Turinium Requirement changes.
Map Example
I selected Terran (grassland) terrain and default Lighting. As you will see in the demo I change to Frozen Terrain later, it’s easy to do so don’t worry too much about your selection here.
The following is the default map that you are given. It starts with two player Nexuses, a Turinium Generator and one other region. But we have lots of things we can add.
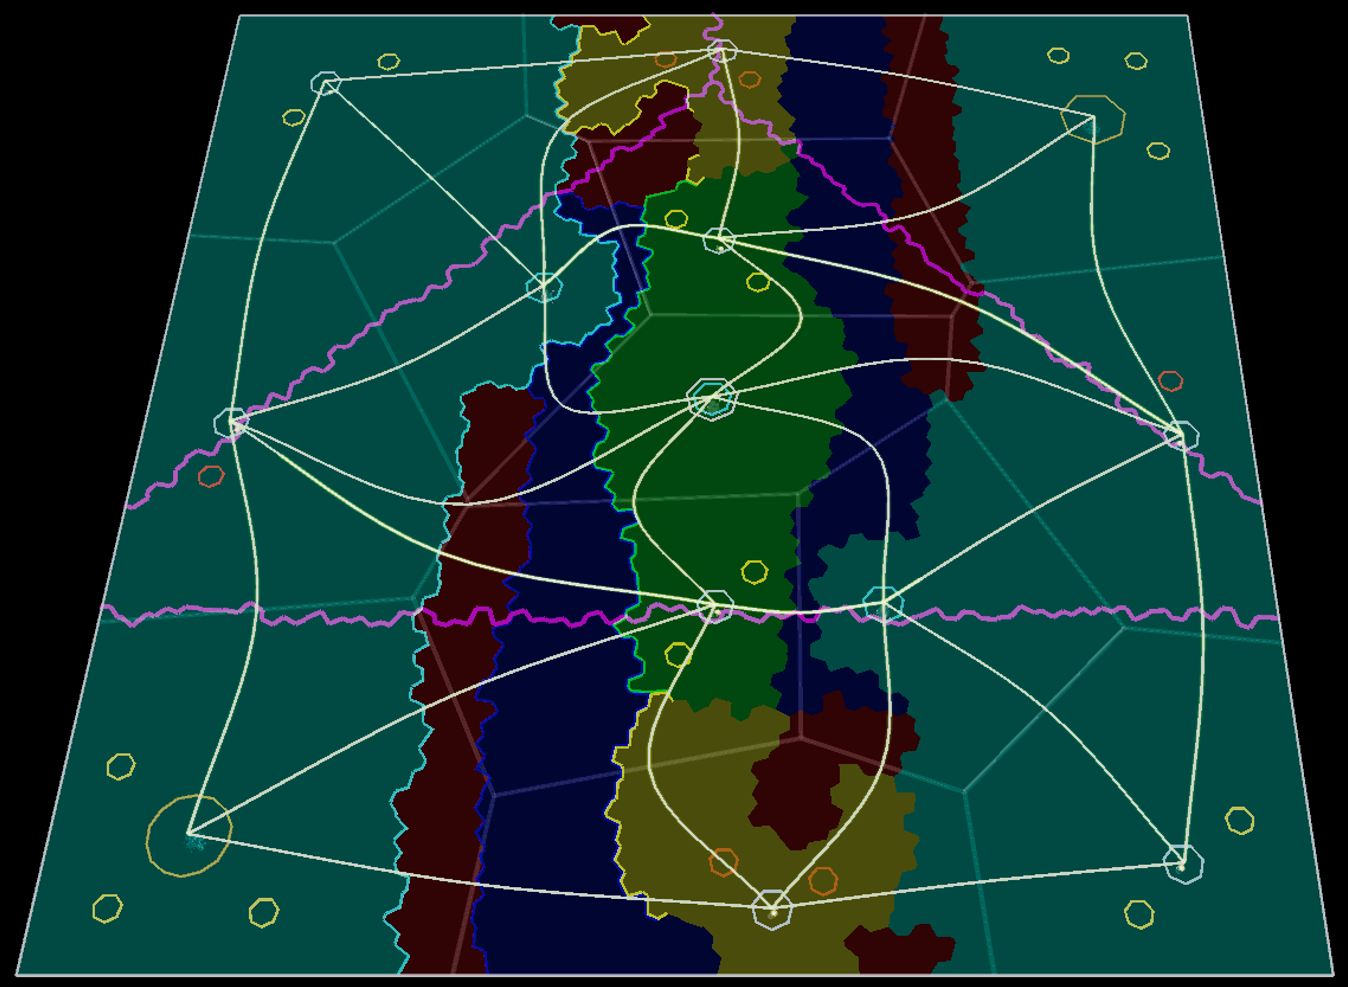
Teal is plateau, red is mountains, blue is basins, yellow is hills and the green is plains.
The player Nexuses are in the upper right and the lower left. The point of this map was to create a single channel for the players to battle through. The upper part is biased for the player on the left, giving him a plateau to fire down at enemy units driving by the area below and the reverse for the southern part of the map.
There are three Turinium_Generators, one in the center of the map and one on each of the two plateaus overlooking the plains pass. The goal is to make one Turinium Generator easy for each player to grab so they need to battle over the one in the center (since victory points are awarded to the player who holds the majority of generators).
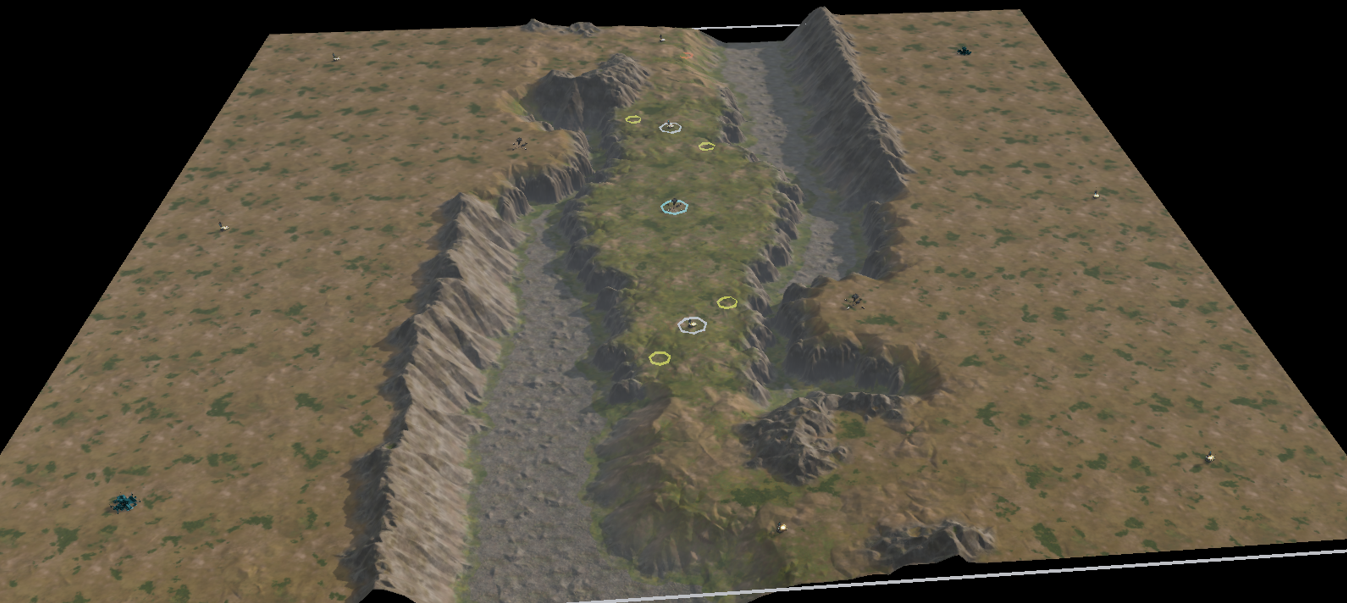
Rebuilding the terrain and toggling to map display mode gives us a look at what the map will look like. I like the pass, the mountains and the basin. But the rest looks a little bare. So I need to add more details to make that area more interesting. I often forget how big the Ashes maps are, so when I toggle to the real map they don’t seem as full as I imagined.
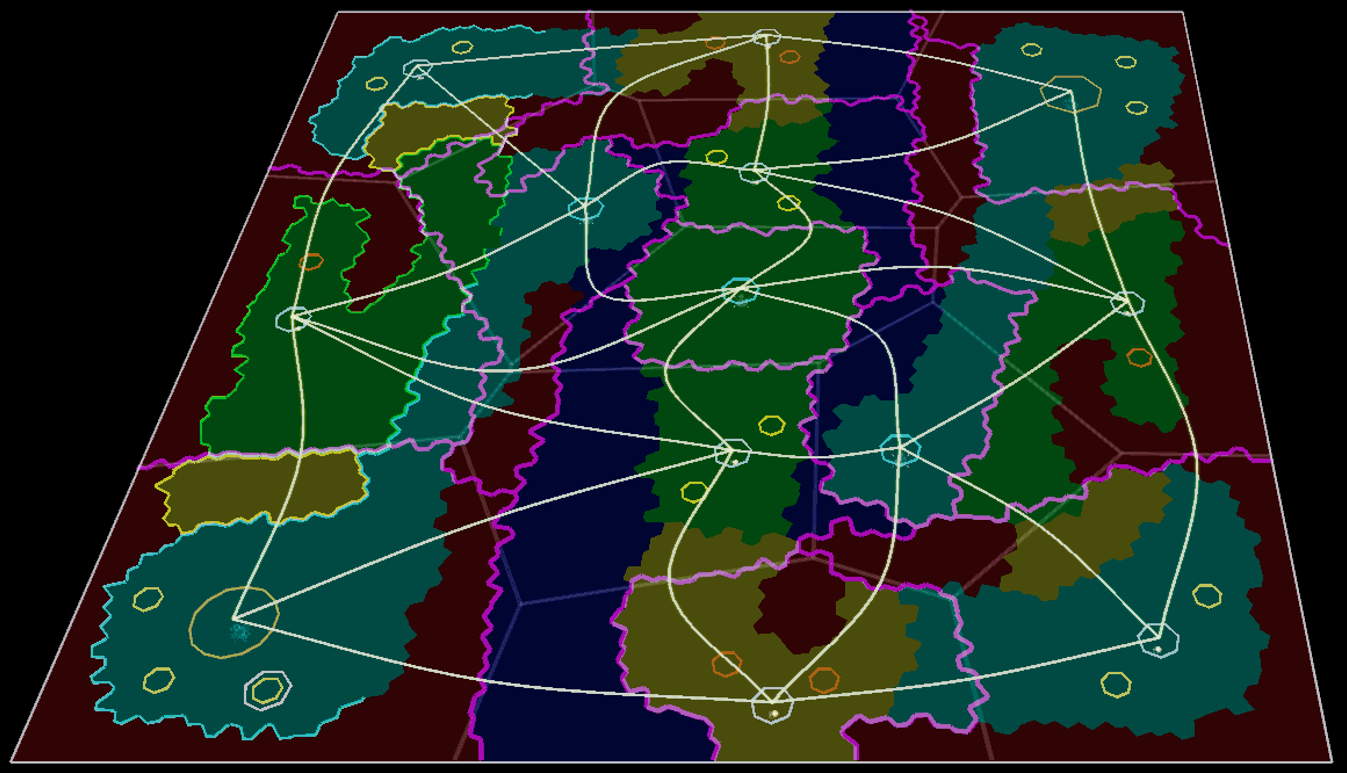
In this update I’ve added more opportunities for the defending player. The overlooking plateaus can only be accessed from the Nexus region so they get to attack in the central channel as well as attacking units forced to come by the plateau wall on their way to the Nexus.
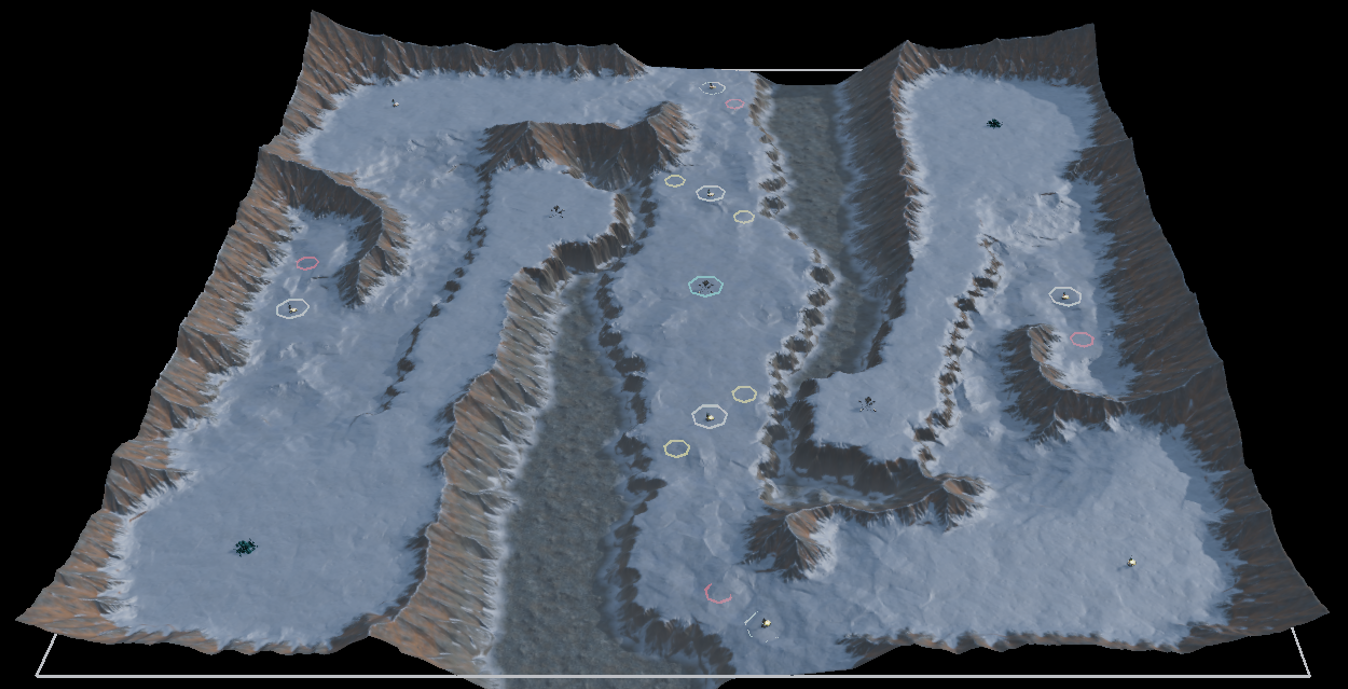
I’ve also switched it over to the Frozen terrain. I think its brutal hostility fits the maps focus better. I put the build quality up to 4 and increased the erosion levels so it looks great. It took a lot more time to generate (btw: don’t attempt to use high build levels on the largest possible maps unless you have a lot of memory) but it looks great.
This map is a lot of fun to play, but may favor aircraft too strongly (since they can bypass all of these defense and attack anywhere. In a later section we will talk about creating scripts where we could do things like disable aircraft so the players are forced to slug it out.
Updating Turinium Requirements
By default, maps will have lowTurinium Requirements. (How much Turinium is required for players to win.) To increase this, select "Edit MapProperties.xml" under the "File" menu in the top left corner, and change the number inside the victory_point_cap="500" to the desired Turinium. (Using Notepad++ is recommended) Save the .xml file, but the Turinium levels won't be updated until you open up the map again in the Map Editor, and Regionalize or Regenerate the map terrain. Regionalize is much faster than Regnerate, and is all you need to do for the purpose of updating Turinium. To check a maps Turinium requirements, you can also play the map in a Skirmish and in the top right corner you will see a Turinium value in the player panel.
Distributing Maps
Maps will not be downloaded when a player joins a lobby that is on a new or edited map, attempting to start the match will result in a crash. A modder will need to upload their map to a web hosting platform such as Dropbox, and everyone wishing to play that map will have to manually download and install the map into \Steamapps\common\Ashes of the Singularity Escalation\Assets\Maps. Every time that map receives a change, even if the name remains the same, it will have to be redownoaded. We don't currently have Steam Workshop support enabled for Ashes, but it is something we are hoping for.
Fixing Issues
The current form of the Map Editor wasn't intended for public use, which is why it's hidden behind the -modding command. The Map Editor is rough and a number of unintuitive things can cause crashes with no explanation to the user, causing much frustration. There's a number of things the Map Editor doesn't like which can cause crashes during regenerating terrain or loading into it. Alternative to crashes, problems can also be manifested by the map editor endlessly hanging at regenerating terrain. (If you check your CPU usage, you can tell when the terrain generation is actually working or when it has frozen.) If you are experiencing a crash or map editor being stuck during terrain generation, ensure none of these things are happening:
- Buildings are on Mountain, Hill or Basin - Buildings shouldn't be placed on all terrain types.
- Too many Effects - Effects are experimental and can cause crashes if there's too many of them. Remove all effects and see if the crash persists.
- Adjacent Terrain Types - Placing different terrain types adjacent can cause a crash. This is hard to identify, but if you have Plateau, Lowlands and Basin all connected next to each other, it can cause a crash.
- Terrain Quality too high - Try lowering the Terrain quality to 1 and see if it still crashes during render.
- Buildings hanging over map edge - Ensure none of the buildings are hanging over the edge of the map, this can especially happen with the Dead Regions.
- Sky Background incompatible with Terrain Type - This is easy to identify because the crash will occur when you place a Nexus. The Sky Background options seem to be incompatible with the newer Terrain Types introduced in Escalation such as Crystal, Lava, Turinium. Create a new map with default Sky Background settings.
- Black Lines Issue - Sometimes a map won't generate properly, and when you open the map in-game it will have a giant black line throughout the map. If this happens, regenerate the terrain and it will fix it most of the time. If regenerating doesn't fix this issue, you may need to flatten out that effected area then redraw it.
Changing Map Thumbnail
Regenerating Terrain will automatically create a map thumbnail which shows up in the map selection menu and in the in-game minimap. However, the default generated thumbnails are quite messy compared to ones which are manually created, which is what every map in the game uses. Creating a release quality map thumbmail involves a few steps, require some basic knowledge of either Adobe Photoshop or GIMP (which is a free alternative), downloading this map preview shade and will require the Intel .DDS plugin to save the thumbnail to the required format.
Take Screenshot:
- Opt-in to a Modding build under steam betas to enable the developer tools
- Open up the developer tools by pressing ` or HOME
- Click “Player Menu”
- Check “Screen Shot View”
- Wait for the fog to clear/lighting to normalize. - Large maps sometimes cause your machine to freak out here and show weird graphic glitches, but they should time out
- Capture a screenshot of the entire map
Edit Screenshot:
- Open screenshot of map in Photoshop or GIMP
- Crop your shot down to just the map terrain - (a little black at the very edges is okay.)
- Resize it to 512x512 pixels EXACTLY
- Boost saturation or curves - This is optional, but in some map types you may want to lighten up the thumbnail to make it look nicer, this is done is almost all of the existing maps and is especially important in Crystal or Turinium maps.
- Add the map preview shade as a new layer
- Merge the layers
- Export as MapPreview.dds in map directory - (no mipmaps. Must have this filename exactly, will override existing one) The .dds file format will only appear if you have currently installed the intel .dds texture plugin.
You should now see this much nicer thumbnail when you load the game. Regenerating the map will automatically generate a new MapPreview.DDS file which will overwrite this one you have made, so to prevent this you can make it Read Only so it won't be overwritten. If you change the terrain layout of the map you will want to create a new thumbnail, but if you are only changing the building layout there is no need to change the thumbnail.